Send informational and promotional SMS messages to defined groups of patients. These messages will use SMS credits to send to each recipient.
This feature requires Zedmed v36.9 or later.
Sending a Marketing Messages SMS
Step 1 - selecting the recipients
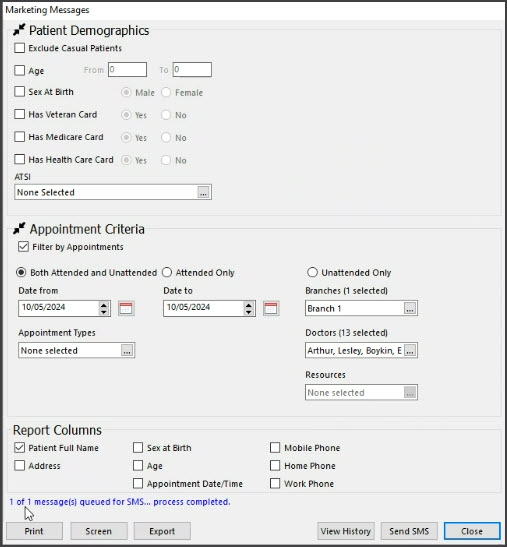
Each time you send Marketing Messages, the recipients are defined using the Patient Demographics and Appointment Criteria options.
- Select the Marketing button on Zedmed's Reception tab.
The Marketing Messages UI will open. - Define the recipient criteria for the SMS.
Patient Demographics:
• Patients with the status Current and Casual in their Patient Records are included. Archived patients are not included.
Whether you Exclude Casual Patients will depend on the criteria the practice uses for a patient's Status.
Casual is often used for patients who are not regular or make one-off appointments.
• The Card types use Yes No options to allow you to define requirements for one or more cards.
Appointment Criteria:
• Multiple selections can be made for Appointment Types and Branches.
• A Branch selection must be made before doctors can be selected. - Select the Screen button to review the recipients.
This will open the report view so you can review the recipients.
Step 2 - Sending the SMS
- Select Send SMS.
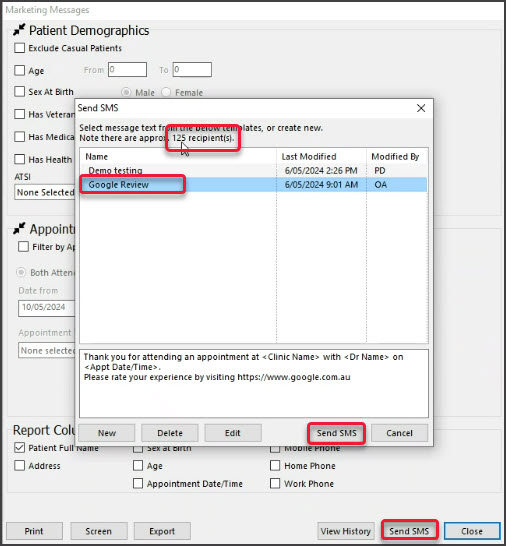
The Send SMS dialog will open and show the message templates. - Select the message template to be used.
The content of the message will be displayed. - Review the number of recipients to avoid unexpectedly large SMS sends.
The example below shows 125 recipient(s). - Select Send SMS.
The messages will begin to send and display the progress at the bottom of the Marketing Messages screen.
Note: Pressing Esc will open a dialog allowing you to select Yes to 'Stop sending the remaining messages'.
Creating and editing templates
SMS messages are created as templates that can be used multiple times. There is no limit to the number of templates that can be saved.
These steps can also be used to edit an existing template.
To create a Marketing Messages template:
- Select the Marketing button on Zedmed's Reception tab.
The Marketing Messages UI will open. - Select Send SMS.
- Select New (or Edit).
- Add the template name.
- Add and delete the message text as required.
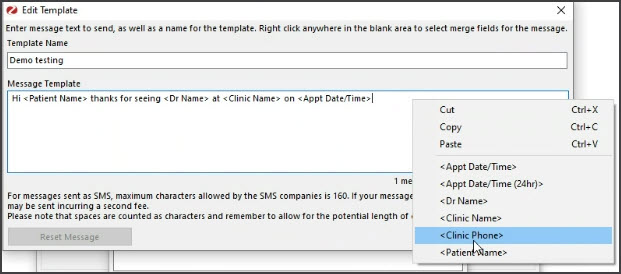
- Right-click anywhere in the blank area, and the available merge fields will appear.
- Select a merge field to enter it into the message text.
- Review the character count to see if the SMS will require more than one message to send.
- Select Close to save the changes.
Note: If you accidentally delete a template, contact Zedmed Support to see if it can be recovered.
Marketing Message history
Past Marketing Messages can be viewed in Message Manager, Patient Records and the View History screen.
Message Manager
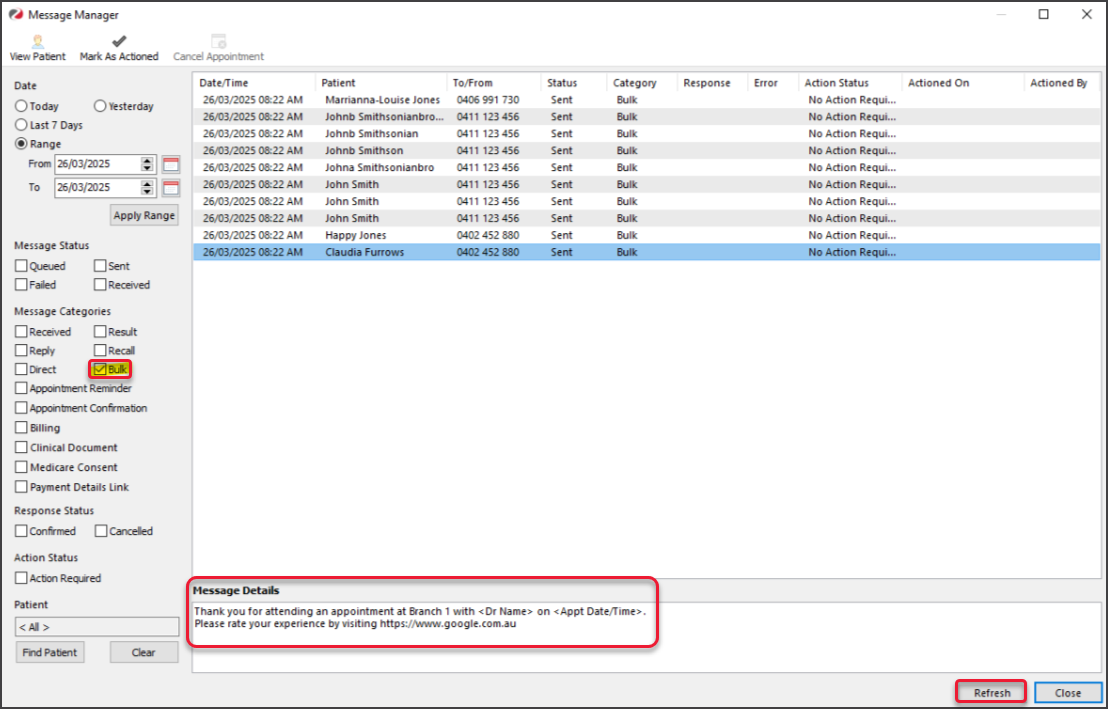
All Marketing Messages are saved and can be viewed in Message Manager using the Bulk filter.
To open Message Manager:
- Select Zedmed's Management tab.
- Select the Messages button.
- Use the Bulk filter to view Marketing Messages.
Selecting a patient (recipient) will show the message content under Message Details.
If you change the date range, select Apply Range to update the messages shown.

Patient record
The Message tab in a patient's record shows all SMS messages sent to that patient, including any Marketing Messages.
View history
The Marketing Messages View History screen can be used to review the details of past messages, including the criteria that were selected, the number of messages sent, the text used and the recipients.
To view the Marketing Messages history:
- Select the Marketing button on Zedmed's Reception tab.
The Marketing Messages UI will open. - Select the View History button.
The View History screen will open.
There is a line for each SMS sent with the date and number of messages sent. - Expand a specific SMS send to view the criteria used.


