The Chronic Condition Management (CCM) module prompts doctors to create plans for patients who may be eligible for CCM Medicare items. This guide explains the steps required to add triggers for these plans when patients present with eligible problems and how to upload the new GPCCMP template for the 1 July 2025 changes.
Zedmed v38.8.1 or later is required to be compliant with the July 2025 changes .
Important: From 1 July 2025, GP management plans (GPMPs) and team care arrangements (TCAs) were replaced with a single GP chronic condition management plan (GPCCMP). The existing MBS items for developing and reviewing GPMPs and TCAs ceased, and new MBS items for the GPCCMP were introduced.
To learn how to use the CCM module, see the user guide.
Overview
For the module to work efficiently, the following setup steps should be performed:
- Associate the relevant document templates with the Medicare CCM items.
- Link recalls to these items where relevant.
- Switch the CCM module on for either the whole practice or individual doctors.
- Identifying problems that trigger the CCM module to notify the doctor (when in a patient record) that the patient may be eligible for one or more CCM items.
For the CCM module to trigger CCM Medicare items, two sets of problems need to be identified and configured:
- Problems to trigger the Mental Health items
- Problems to trigger GP Management Plan items.
Each problem type is further defined using either ICPC2+ or free text (via Zedmed or another application). The following sections explain how to link problems to CCM Medicare items, so a plan is triggered when a problem is identified.
Important: The CCM Module eligibility criteria and automatic prompts rely (in some instances) on whether or not patient records contain certain current problems. If practices do not consistently define problems for patients, the efficacy of this function will be impeded.
Add GPCCMP templates
The 1 July 2025 changes replaced the GP management plans (GPMPs) and team care arrangements (TCAs) with a single GP chronic condition management plan (GPCCMP). This section explains how to add that template to Zedmed.
Step 1 - Download the templates
- Go to www.zedmed.com.au.
- Sign in to the Client Portal Login portal with your Username and Password.
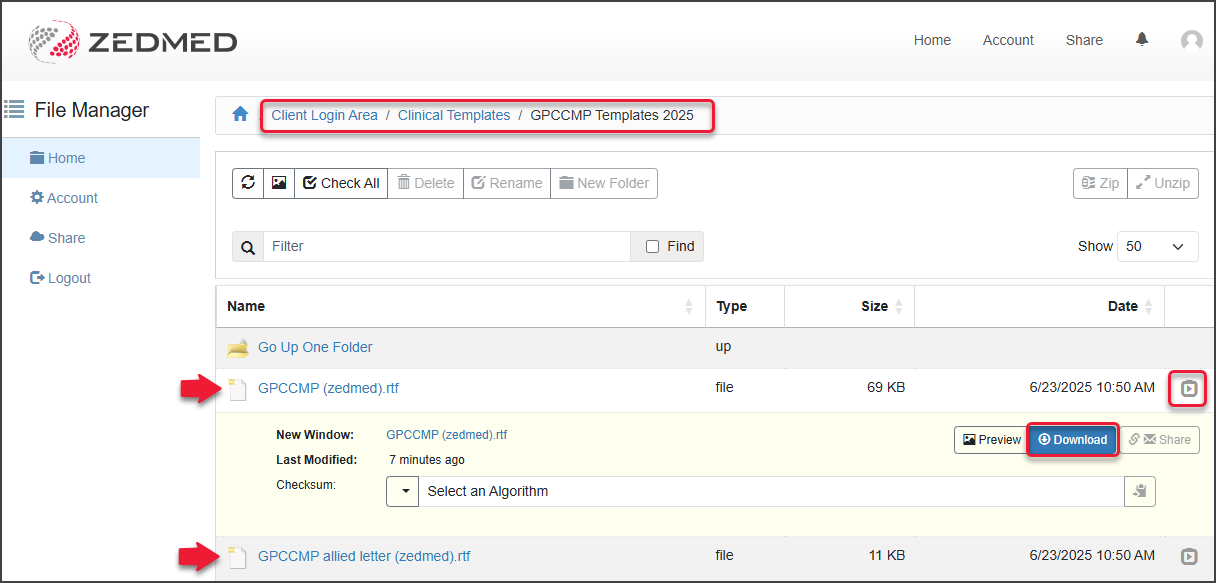
- Select the folder called Client Login Area.
- Select Clinical Templates > GPCCMP Templates 2025.
There are two templates: GPCCMP (zedmed).rtf and GPCCMP allied letter.rtf. - Select the down-arrow icon on the left of the applicable template to expand (GP or Allied).
- Select Download.
- You can now import the template using the instructions below.

Step 2 - Import the templates
- Open Clinical Records.
- Select Tools > Clinical WP Setup > WP Templates.
- Select File > Import Template.
- Select the Browse button to locate and select the template you want to add.
- Enter a name for the template into the Description field, then select OK.
The template will appear under My Templates in the Template selection.
You can now add the template to Quick Documents using the instructions below.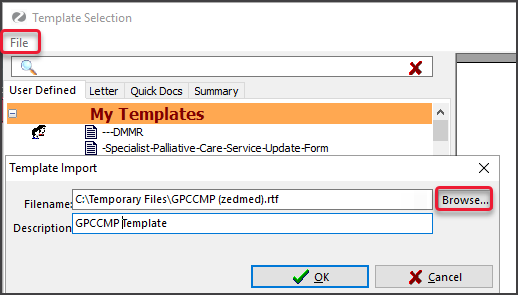

Step 3 - Add the templates to Quick Documents
- Open Clinical Records.
- Select Tools > Clinical WP Setup > WP Templates.
- Right-click the document.
- Select Toggle available for all Users (if applicable)
- Select Toggle as Quick Documents button menu item to add or remove the item from Quick Documents.


Link mental health problems to mental health items
The section explains how to map both the free-text-defined problems and the ICPC2+ defined problems, since there is nothing relevant to Mental Health in the ICPC2+ grouper.
To link the mental health problem:
- Select Tools > Clinical Setup > Chronic Condition Management.
The Chronic Condition Management module will open. - Choose a Mental Health item from Patient Eligibility Triggers.
- Select Map ICPC Codes or MAP Text and follow the applicable section below.
• Map ICPC Codes is for mapping ICPC2+ generated problems to Mental Health Items.
• Map Text is for mapping the free-text-generated problems to Mental Health Items.

MAP ICPC Codes button
Selecting Map ICPC Codes displays the screen below.
All ICPC2+ diagnosis codes available are listed and can be set as True or False:
• True - the problem will trigger the CCM Module for a patient assigned this problem via ICPC2+.
• False - the problem will NOT trigger the CCM Module for a patient assigned this problem via ICPC2+.
To save any settings, select the Apply and Refresh button ( before selecting Next or Previous to see another page).
To remove a setting (i.e. reset to Unassigned), right-click the relevant radio button and select Set Unassigned.
You can set all unassigned problems to False by right-clicking a radio button then left-clicking Set all fetched unassigned records false and then modify any that should be True by clicking the relevant radio button.

The top totals show the number of problems to be mapped, problems currently mapped and the percentage of problems mapped.
Change Filter button in ICPC
Allows you to change the filter to display different problems. The default setting is to exclude already-mapped problems. This can be changed to include the mapped problems for review and possible modification by selecting the Yes radio button in the Include Mapped Records Box. Problems starting with a particular letter can be displayed if the user wishes to review specific problem (s). Zedmed has default mappings for ICPC-2+ Mental Health problems that each practice can review and modify.

Important: If your filter is set to exclude mapped problems (this is the default setting), the mapped records will disappear from the display when you click on Apply and Refresh.
MAP Text button
This button is used to map defined problems using free text. Selecting this button displays the free-text problems assigned to patients in Zedmed Clinical at this practice.
The problems are listed based on the number of times they have been assigned, ensuring the most frequently used problems are mapped first. The problems can be set to True or False to trigger the CCM module when a patient is assigned the problem, as described above.

The totals at the top show the total number of records assigned to patients. This means every time a problem is assigned to a patient the count increases by one. The # Mapped and % Mapped show the number and percentage of defined problems that have been mapped.
Change Filter button in Map text
Allows the user to display the mapped records (the default is to show the Free Text problems that have not been mapped) and to either show ICPC-coded problems that have been assigned to patients or not. In all cases, there is the option to filter the problems displayed to those starting with a particular letter. This is to assist the user in locating a particular problem or group of problems.

Link chronic conditions to reviews
The section explains how to set up a chronic condition problem to trigger a GP Management Plan or a GP Management Plan review. The ICPC2+ grouper has a grouping relating to this category of problems. This means that any problems defined for patients using ICPC2+ will be automatically set to trigger (or not) the CCM Module according to this grouper.
To link chronic conditions:
- Go to Clinical.
- Select Tools > Clinical Setup > Chronic Condition Management.
- Choose a chronic condition from All Patient Triggers.
- Select MAP Text to display the free text problems that have been assigned to patients in Zedmed Clinical at this practice.
- Select True or False to trigger the CCM module when a patient is assigned the problem.
• True - the problem will trigger the CCM Module for a patient assigned this problem via ICPC2+.
• False - the problem will NOT trigger the CCM Module for a patient assigned this problem via ICPC2+. To save any settings, select the Apply and Refresh button (before selecting Next or Previous to see another page).
To remove a setting (i.e. reset to Unassigned), right-click the relevant radio button and select Set Unassigned.

The problems are listed based on the number of times they have been assigned, ensuring the problems are mapped to the most frequently used ones first. The totals at the top show the total number of records assigned to patients. This means every time a problem is assigned to a patient the count increases by one. The # Mapped and % Mapped show the number and percentage of defined problems that have been mapped.

Set up Recalls
Relevant recalls can be linked to individual items in a similar way to the linking of relevant document templates.
To set up a recall:
- Choose a patient trigger from the drop-down list.
- Select the Linked Recalls tab.
- Under Unselected Recalls, select the recall required.
- Select the arrow pointing right to move the template to the Selected Recalls list.
- If the default maturity period is not suitable for CCM purposes, select the Day, Month, or Year radio button and enter the required number.

When you create a plan in the CDM module, the Associated Recalls screen allows you to add a recall for that patient if required. When using the template from Quickdocs, you will need to send a manual recall from the patient's record.
