For ECLIPSE billing, the Health fund or Patient can be the payer. The instructions below are relevant to scenarios where you need to manually receipt an ECLIPSE payment for a voided invoice - and the Health fund is the payer.
When payments are received for ECLIPSE claims, a single Payment ID may cover invoices for multiple patients. If a payment has been received for a voided invoice and it is a valid payment, a replacement invoice needs to be created. All invoices for the Payment ID may be receipted:
- individually through each patient's Account Enquiry, or
- collectively through the Account Payers Details, Payment Allocation screen.
The final step is to use the Manually Associate Receipts functionality in the Claims screen to enable the reconciliation of the full payment.
Step 1 - Create a replacement invoice:
- Go to Zedmed's Management tab.
- Select Claims.
- Select the Payments tab.
- Double-click the applicable Payment ID with the voided invoice to display it in the Claims tab, expand the ID and take a screenshot or use the Print Report button.
- Right-click on the patient name with the voided invoice ($0 in the Outstanding column) and select Patient Details.
- Using the Bill menu, create a replacement invoice using the details (service date, items) of the original invoice, ensuring that the Health fund is the Payer.
- Suppress the invoice.
Step 2: Option A - Receipt the invoice using Acc Enquiry
- In the patient's Acc Enquiry, ensure the Payer is the Health fund, note the invoice number you have just created.
- Select the invoice and select the Receipt button.
- On the Receipt Payment screen, select Direct Deposit.
- Choose the Banklist that the payment was made to.
- Change the amount to reflect just this patient’s payment.
- Select Add.
- Select Allocate.
- Locate the replacement invoice and select Fully Receipt.
- Note the Receipt number allocated to this invoice.
Use the steps above to individually receipt the remaining patient invoices in the Payment ID and then follow the steps to Manually Associated Receipts.
Step 2: Option B - Receipt collective invoices using Account Payers Details
- Go to Zedmed's Management tab.
- Select the Debtors, Account Payers.
- Search for the Health fund.
- Select the Payment Allocation button at the bottom left.
- The Third Party Account Enquiry/Allocation screen will open.
- Adjust the date range to display the relevant invoice period, select Go.

- Listed will be the outstanding invoices for the Health fund for one or multiple patients.
- Select Receipt.
- On the 3rd Party Receipt screen, select Direct Deposit .
- Choose the Banklist that the payment was made to.
- In the Amount field enter the full amount of the Payment ID.
- Add the Pay Date and other relevant details
- Select Add.
- Select Allocate.
- On the Allocation screen, select the newly created invoice and select Fully Receipt. Do this for the remaining invoices in the Payment ID.
- Select Close.

If a dialog appears asking to allocate remaining credits, select No.

The same receipt number will be allocated to each invoice, note this number.
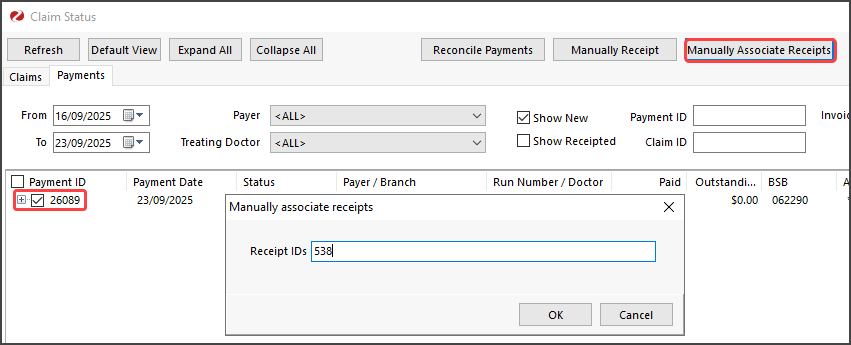
Step 3 - Manually Associate Receipts
- Return to the Claims screen.
- Select the Payments tab.
- Select the applicable Payment ID checkbox.
- Select Manually Associate Receipts
- On the dialog box enter the receipt number/s separated by a comma.
- Select OK.